 I’m sure you’ve noticed, organic reach of Facebook pages plummeted. A study from Ogilvy showed that pages only reached about 6% of their followers in 2014, down from 16% from 2012.
So what do you do if you want to promote your business and build authority in your industry, but don’t want to spend thousands on Facebook ads?
Learn how to create a group on Facebook.
Facebook’s official response on the decline of organic reach blames the sheer volume of pages and content competing for a spot in a person’s newsfeed.
They’re supposedly limiting organic reach so that people who have liked multiple branded pages on Facebook don’t get swamped by promotional content on their newsfeed. They want to make sure individual users only see what that they’re interested in.
So it’s not that you shouldn’t share content on Facebook—they’re just selective of who sees your content. But if you can gather a group of people truly interested in your niche, then it’s a win-win for everyone.
That’s what Facebook groups are for.
Facebook Groups Give You Control
With Facebook groups, you have control over the group’s visibility and membership. Because many groups are private, members have the luxury of sharing information outside prying eyes of their family, boss, or friends.
You won’t be at the mercy of algorithms, too. Groups have the function to send notifications to group members whenever you post a new item.
How to Create a Group on Facebook
1. Who are Your Potential Group Members?
Sounds familiar? You’re not going to jump in and learn how to create a group on Facebook without first identifying your target audience.
This is the same question you have to answer every time you want to connect with people on social media.
You can approach this in two ways:
- Create a group that focuses on your business, including its products and services.
- Build a group catering to your target audience but don’t limit the discussion to your business. You’ll also touch on common goals, problems, and interests of your industry.
A Facebook group for a travel agency might also post links about working abroad, in addition to the usual travel tips and itineraries.
I wouldn’t say the first approach is the best. It all depends on your business and your goals. Here are pros and cons to consider:
| Focus | Pros | Cons |
| Your business |
• Tight-knit community of people interested in your product, services, and your expertise • More room for you to share your expertise with other members |
•Might have fewer members • Content shared might be less relatable to the general crowd. |
| A wider subject matter for your target audience |
•More members •Opportunity to spread news about your brand to new faces •Cross promotion opportunities |
• Discussion might veer too far from your business •Might attract competitors and spammers |
Whatever you choose will affect the way your community grows.
2. Setup the Facebook Group
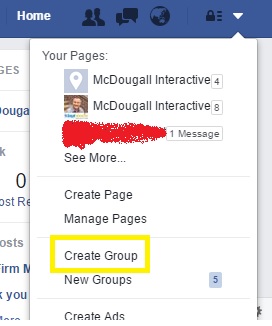
Go to your personal Facebook account, press the arrow down button and click “Create Group.”
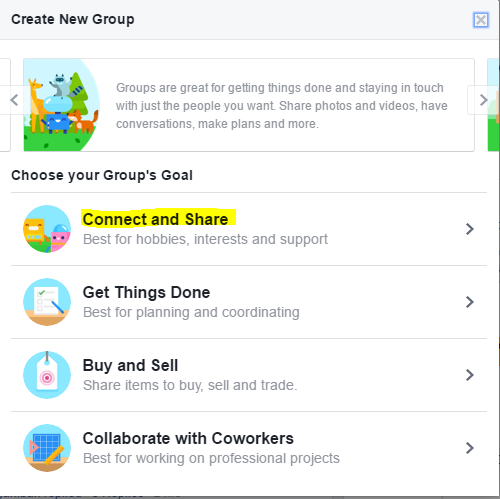
Facebook will then prompt you to choose a purpose for the group. Choose “Connect and Share.”
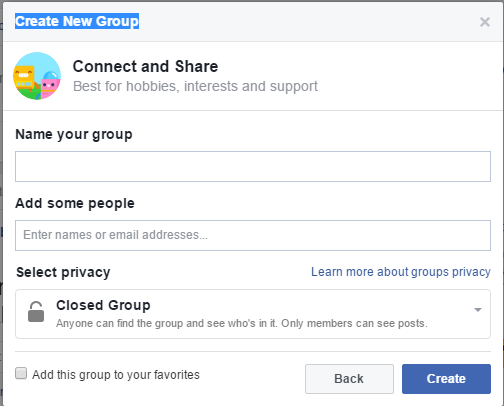
3. Name Your Group
Use the name of your business or website.
But if you’re targeting a wider audience, choose a name that makes sense for the group’s goals as discussed in step 1. For instance, the name “Social Media Managers of New York” makes sense for a group of social media professionals in that state.
Then select “Closed Group” in the privacy options. You might think this will seriously limit your group’s reach.
Not exactly. Closed groups still appear on Facebook searches, but only approved members can see what’s happening inside the group. This setting accomplishes three things:
- Makes members feel special for being part of an exclusive group.
- Member discussions and threads are kept private. Their Facebook connections don’t see it unless they’re also part of the group.
- You can screen people who join the group to minimize spammers.
Next you have to add the first group member. Unfortunately, you can’t add yourself so you have to add someone else. Pick someone who won’t mind getting added temporarily then just remove them from the group later.
Don’t forget to tick the “Add this Group to your Favorites” option, so you can quickly see it on your Facebook profile sidebar anytime.
4. Choose a Group Icon and Cover Photo
This step is optional, but if you can find an icon that fits your group’s name then great!
![]()
After this, you’ll be redirected to your group’s official page. But you’re not yet done, you still have a few steps to go in making your group inviting for potential members.
First up is your cover image. If you’re creating a Facebook group specific for your business, use your company logo or at least a picture people will associate with your brand. Minimum cover photo size is 399 x 150 pixels.

5. Write an Optimized Group Description
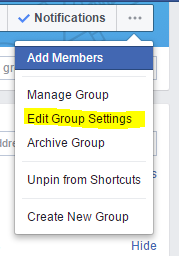
Click on the ellipsis (…) beside the notification button then select “Edit Group Settings.” Then scroll down to “Description.”
Write a description that explains who your target members are, what they can expect from joining, and why you created it. Then introduce yourself as the group’s creator and moderator and link back to your website.
Write a description that shows you’re eager to connect with people that have the same interests, or works in the same industry. Yes, you want to build your authority and promote your business on this page but you don’t have to be blunt about it. Emphasize your willingness to help and make connections instead. No one will join your group if it reeks of self-promotional content.
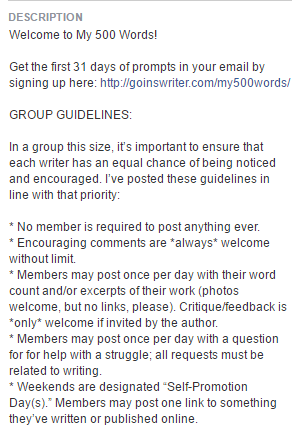
You can also include a group vision or guidelines so members will know how they’re supposed to behave in the group. Doing this minimizes arguments and spamming from members.
Below is an example from the Facebook Group My 500 Words.
Sprinkle your description with keywords (aka Tags) so your group will appear in search results for those words.
Then choose up to 5 tags that Facebook will use to identify what your group is about. For example, if the group is about swimming, you might use tags like swimming, underwater, diving, exercise, and freediving.
6. Optimize the Group’s Settings
You’ll be prompted to customize a few settings, such as:
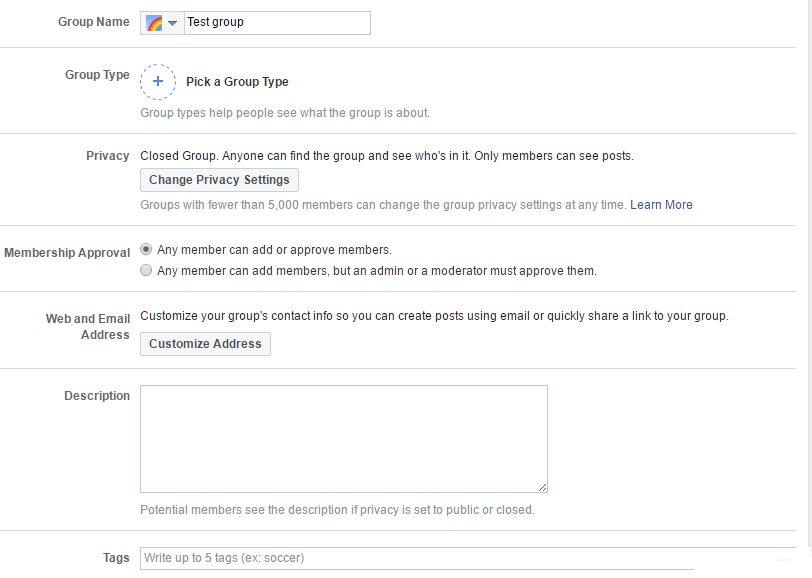
- Group name
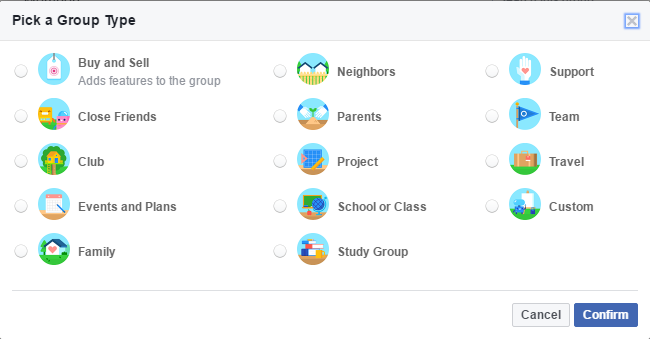
- Group type: Facebook gives you different options to categorize the type of group you’re creating. For most businesses though, the best option is “Custom” since you’re creating a group to connect with potential customers but “Buy and Sell” doesn’t exactly fit your group’s description.
- Privacy settings
- Membership approval: Can other members approve or invite other members?
- Web and Email address: Choosing a Web URL gives your Facebook group a customized URL instead of a bunch of random numbers.
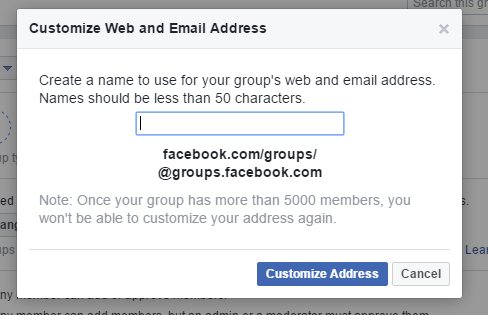
Facebook will automatically give you an email address based on your chosen group name. Emails sent to that address will appear as posts on your group.
You can also change…
- Posting permissions: Can members post or will it be limited to admins only?
- Post approval: Do admins have to approve every post? This is only a good idea if you already have thousands of members in the group. When you’re just starting out, you want to initiate and encourage conversations, not censor them.
Next Step: Scoring Your First Group Members and Ramping Up
Voila, you’ve created your own Facebook group. Yes it’s totally empty right now except for that unknowing friend you just added. But that’s okay, because next week I’ll show you how to promote your group and get more members.
Do you feel that Facebook groups are a worthwhile investment or too much of a time commitment? Let us know in the comments below.
